1
2
3
4
5
6
7
8
9
10
11
12
13
14
15
16
17
18
19
20
21
22
23
24
25
26
27
28
29
30
31
32
33
34
35
36
37
38
39
40
41
42
43
44
45
46
47
48
49
50
51
52
53
54
55
56
57
58
59
60
61
62
63
64
65
66
67
68
69
70
71
72
73
74
75
76
77
78
79
80
81
82
83
84
85
86
87
88
89
90
91
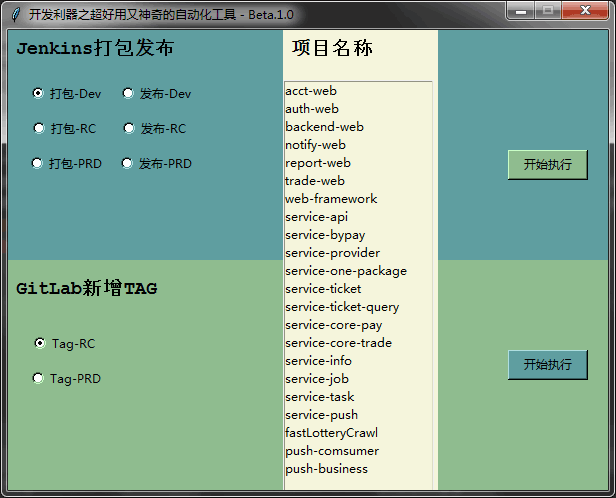
| # ====== start 窗口布局 =========
window = tk.Tk()
window.title('开发利器之超好用又神奇的自动化工具 - Beta.1.0')
x, y = 600, 460 # 定义窗口的宽高
scr_x, scr_y = window.winfo_screenwidth(), window.winfo_screenheight() # 获取屏幕大小
window.geometry("%dx%d+%d+%d" % (x, y, (scr_x-x)/2, (scr_y-y)/2)) # 窗口居中显示
window.resizable(0, 0) # 窗口大小固定,不能缩放
# ======= Frame 整体框架搭建 ======
# 创建三个不同背景颜色的Frame, 用来区别不同的内容
frm_1 = tk.Frame(window, width=600, height=230, bg='CadetBlue').pack()
frm_2 = tk.Frame(window, width=600, height=230, bg='DarkSeaGreen').pack()
frm_3 = tk.Frame(window, width=155, height=600, bg='Beige').place(x=275, y=0, anchor=tk.NW)
# 新建一个字体样式
ft = font.Font(family='Courier New', size=14, weight=font.BOLD)
# 创建三个Label,作用于之前的三个Frame中,给每个Frame命名
lb1 = tk.Label(frm_1, text='Jenkins打包发布', font=ft, bg='CadetBlue')
lb2 = tk.Label(frm_1, text='GitLab新增TAG', font=ft, bg='DarkSeaGreen')
lb3 = tk.Label(frm_1, text='项目名称', font=ft, bg='Beige')
# 绝对定位,这里面大部分控件都是用的绝对定位的方式
lb1.place(x=5, y=5, anchor=tk.NW)
lb2.place(x=5, y=245, anchor=tk.NW)
lb3.place(x=280, y=5, anchor=tk.NW)
# ======= Jenkins 上半部分布局 ======
# 用于记录选中值的变量,默认选中J_PKG_DEV
radio_var1 = tk.StringVar()
radio_var1.set(Constant.J_PKG_DEV)
# 定义了6个Radiobuttom,用于选择具体的发布环境
dev_package = \
tk.Radiobutton(frm_1, text='打包-Dev', variable=radio_var1, value=Constant.J_PKG_DEV, width=10, bg='CadetBlue')
rc_package = \
tk.Radiobutton(frm_1, text='打包-RC ', variable=radio_var1, value=Constant.J_PKG_RC, width=10, bg='CadetBlue')
prd_package = \
tk.Radiobutton(frm_1, text='打包-PRD', variable=radio_var1, value=Constant.J_PKG_PRD, width=10, bg='CadetBlue')
dev_deploy = \
tk.Radiobutton(frm_1, text='发布-Dev', variable=radio_var1, value=Constant.J_DEP_DEV, width=10, bg='CadetBlue')
rc_deploy = \
tk.Radiobutton(frm_1, text='发布-RC ', variable=radio_var1, value=Constant.J_DEP_RC, width=10, bg='CadetBlue')
prd_deploy = \
tk.Radiobutton(frm_1, text='发布-PRD', variable=radio_var1, value=Constant.J_DEP_PRD, width=10, bg='CadetBlue')
# Radiobuttom位置分布
dev_package.place(x=10, y=50, anchor=tk.NW)
rc_package.place(x=10, y=85, anchor=tk.NW)
prd_package.place(x=10, y=120, anchor=tk.NW)
dev_deploy.place(x=100, y=50, anchor=tk.NW)
rc_deploy.place(x=100, y=85, anchor=tk.NW)
prd_deploy.place(x=100, y=120, anchor=tk.NW)
# ===== Gitlab 下半部分布局 ======
# 用于记录选中值的变量,默认选中RC_TAG
radio_var2 = tk.StringVar()
radio_var2.set(Constant.RC_TAG)
rc_tag = \
tk.Radiobutton(frm_2, text='Tag-RC ', variable=radio_var2, value=Constant.RC_TAG, width=10, bg='DarkSeaGreen')
prd_tag = \
tk.Radiobutton(frm_2, text='Tag-PRD', variable=radio_var2, value=Constant.PRD_TAG, width=10, bg='DarkSeaGreen')
rc_tag.place(x=10, y=300, anchor=tk.NW)
prd_tag.place(x=10, y=335, anchor=tk.NW)
# ===== Project List 中间部分布局 ======
# 定义了一个ListBox控件,用来展示项目列表
pro_name = tk.StringVar()
pro_list = tk.Listbox(frm_3, listvariable=pro_name, bg='Beige', width=21, height=300, exportselection=False)
pro_list.place(x=275, y=50, anchor=tk.NW)
# 获取项目列表,逐条插入
for item in Constant.get_project_list():
pro_list.insert(tk.END, item)
# ===== Button =======
# 两个立即执行按钮
btn_J = tk.Button(frm_1, width=10, height=1, text='开始执行', command=btn_j_click, bg='DarkSeaGreen')
btn_G = tk.Button(frm_2, width=10, height=1, text='开始执行', command=btn_g_click, bg='CadetBlue')
btn_J.place(x=500, y=120, anchor=tk.NW)
btn_G.place(x=500, y=320, anchor=tk.NW)
# 显示窗体
window.mainloop()
|